In today’s world, security has become a crucial concern, especially when it comes to safeguarding homes, offices, and personal belongings. Traditional lock-and-key mechanisms, while effective, are increasingly being replaced by more sophisticated and secure methods. Among these modern solutions, biometric security systems have gained significant popularity due to their ability to provide enhanced security and convenience.
One of the most reliable and user-friendly biometric systems is the fingerprint door lock. This project aims to develop a secure, efficient, and cost-effective fingerprint door lock using an Arduino microcontroller, a fingerprint sensor, a relay module, a solenoid valve, and LED indicators. The system ensures that only authorized individuals can gain access by recognizing their unique fingerprints.

Components used in Fingerprint Door Lock Project:
Arduino UNO as Microcontroller: The Arduino acts as the central processing unit for this project. It is responsible for interfacing with the fingerprint sensor, processing the data, and controlling the relay that operates the solenoid valve. The Arduino’s flexibility and ease of programming make it an ideal choice for this project.
Fingerprint Sensor: The fingerprint sensor is the core component of the system. It captures and stores fingerprint images, then compares them to the stored data to identify authorized users. The sensor ensures that the system is secure and reliable, as fingerprints are unique to each individual.
Relay Module: The Single Channel relay module functions as an electronic switch. It allows the low-power Arduino to control the higher-power solenoid valve. When the Arduino receives a valid fingerprint, it sends a signal to the relay to activate the solenoid valve, thereby unlocking the door.
Solenoid Valve: The solenoid valve acts as the locking mechanism. When activated by the relay, it moves to unlock the door, allowing access. Once the door is unlocked, the solenoid valve can be reset to lock the door again after a specified period.
LED Indicators: LED lights are used to provide visual feedback to the user. A green LED indicates that access has been granted, while a red LED indicates that access has been denied. This simple yet effective feature enhances the user experience by clearly communicating the status of the lock.
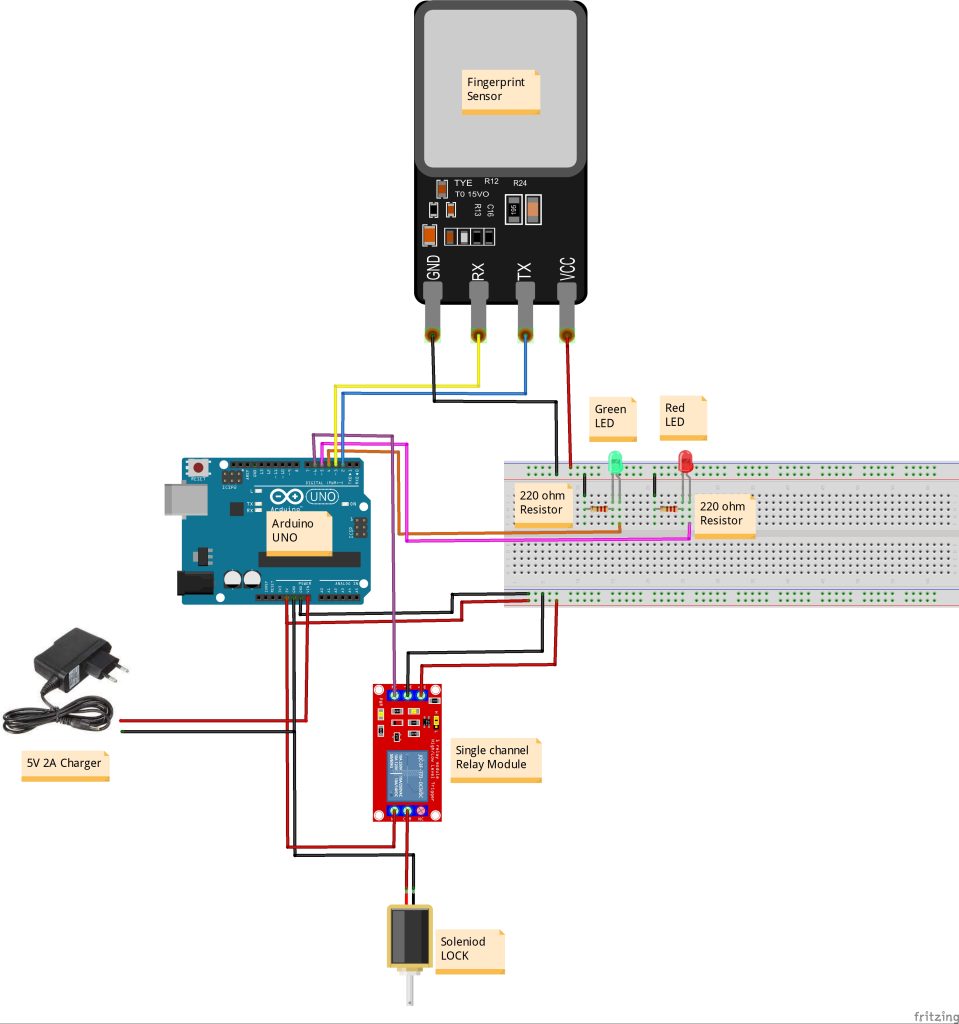
Circuit Diagram of Fingerprint Door Lock Project:

Setup and Working:
1. Wiring the Components:
- Fingerprint Sensor to Arduino:
- Connect the Vcc pin of the sensor to the 5V pin of the Arduino.
- Connect the GND pin of the sensor to the GND pin of the Arduino.
- Connect the TX pin of the sensor to the RX pin of the Arduino.
- Connect the RX pin of the sensor to the TX pin of the Arduino.
- Relay Module to Arduino:
- Connect the Vcc of the relay module to the 5V pin of the Arduino.
- Connect the GND of the relay to the GND of the Arduino.
- Connect the IN pin of the relay to one of the digital output pins of the Arduino (e.g., pin 8).
- Solenoid Valve to Relay:
- Connect the COM pin of the relay to one terminal of the solenoid valve.
- Connect the NO (Normally Open) pin of the relay to the positive terminal of the power supply.
- Connect the other terminal of the solenoid valve to the negative terminal of the power supply.
- LEDs to Arduino:
- Connect the anode (longer leg) of the green LED to a digital pin on the Arduino (e.g., pin 9) through a current-limiting resistor (220Ω).
- Connect the cathode (shorter leg) of the LED to the GND.
- Do the same for the red LED but connect it to a different digital pin (e.g., pin 10).
2. Programming the Arduino:
Here is a sample code to get you started:
#include <Adafruit_Fingerprint.h>
#include <SoftwareSerial.h>

SoftwareSerial mySerial(2, 3); // RX, TX
Adafruit_Fingerprint finger = Adafruit_Fingerprint(&mySerial);

int relayPin = 8;
int greenLEDPin = 9;
int redLEDPin = 10;

void setup()
{
  pinMode(relayPin, OUTPUT);
  pinMode(greenLEDPin, OUTPUT);
  pinMode(redLEDPin, OUTPUT);

  digitalWrite(relayPin, LOW); // Initial state of relay
  digitalWrite(greenLEDPin, LOW);
  digitalWrite(redLEDPin, LOW);

  Serial.begin(9600);
  finger.begin(57600);

  if (finger.verifyPassword()) {
    Serial.println("Found fingerprint sensor!");
  } else {
    Serial.println("Did not find fingerprint sensor :(");
    while (1) { delay(1); }
  }
}

void loop()
{
  Serial.println("Waiting for valid finger...");
  int result = getFingerprintID();

  if (result == 1) { // Fingerprint match
    digitalWrite(greenLEDPin, HIGH);
    digitalWrite(relayPin, HIGH); // Unlock the door
    delay(5000); // Keep it unlocked for 5 seconds
    digitalWrite(greenLEDPin, LOW);
    digitalWrite(relayPin, LOW);
  }
  else if (result == 0) { // Fingerprint not recognized
    digitalWrite(redLEDPin, HIGH);
    delay(2000); // Keep the red LED on for 2 seconds
    digitalWrite(redLEDPin, LOW);
  }
  delay(1000); // Wait before next attempt
}

int getFingerprintID() {
  uint8_t p = finger.getImage();
  if (p != FINGERPRINT_OK)  return -1;

  p = finger.image2Tz();
  if (p != FINGERPRINT_OK)  return -1;

  p = finger.fingerSearch();
  if (p == FINGERPRINT_OK)  return 1; // Fingerprint found
  else  return 0; // Fingerprint not found
}
3. Programming the Fingerprint Sensor:
- Enroll Fingerprints: Before you can use the sensor to unlock the door, you need to enroll fingerprints. There are libraries available (like the Adafruit Fingerprint Sensor Library) that provide examples of how to enroll fingerprints.
- Verify Password: The sensor requires verifying its password during setup. This is usually done by checking the connection between the sensor and Arduino.
4. Testing the System:
- Power up the Arduino and other components.
- Use the fingerprint sensor to enroll fingerprints.
- Test by placing an enrolled finger on the sensor to unlock the door. The green LED should light up, and the solenoid valve should activate, unlocking the door.
- If an unrecognized fingerprint is placed, the red LED should light up, and the door should remain locked.
5. Final Assembly:
- Once the system is tested and working, you can mount the components on a PCB for a more permanent setup.
- Secure the solenoid valve to the door in such a way that it locks and unlocks it.
- You may want to enclose the Arduino and other electronics in a box to protect them.
Applications of Project:
This fingerprint door lock system can be applied in various settings, including:
- Residential Homes: To secure doors and restrict access to specific areas.
- Offices and Workspaces: To control access to restricted areas such as server rooms or management offices.
- Storage Units: To protect valuable items in storage by ensuring only authorized personnel can access them.
- Educational Institutions: To secure labs, libraries, and other sensitive areas.
Conclusion:
The fingerprint door lock project using Arduino presents a practical and modern solution to access control challenges. By utilizing biometric technology, this project enhances security while maintaining ease of use. With the growing need for secure access systems, this project serves as a valuable foundation for further exploration and development in the field of smart security solutions.


